Takahashi FSQ106
Installation and Operational Notes
My second installation at Deep Sky West remote observatory near Santa Fe was a Takahashi FSQ106 refractor. See my discussion about installing the Takahashi TOA130 for information about my first installation there. I also installed a Planewave CDK12.5 reflector at the same time and you can read about that installation here. It's worth repeating that it doesn't pay to skimp when putting together a fully robotic remote rig. If it's only 99.9% automated and 99.9% reliable, it's 0% functional. I took a very similar approach with the FSQ to what I did with the TOA. The scope was the foundation, but it needed a great mount. I had long been on the waiting list for an Astro-Physics Mach 2 mount and in the fall of 2023, Astro-Physics notified me that my name had reached the top. The Mach 2 is far more mount than a short-focal-length refractor needs, so I cannibalized the 10 Micron GM1000 I was using with the C11 at home and earmarked it for the FSQ. I could then use the Mach 2 with the C11 at home. This would ensure that all my remote rigs were on 10Micron platforms, which makes it easier for me to manage.
I had loved the Moonlite focusers I had used on the C11 and TOA, so I went the same route on the FSQ by purchasing a Moonlite Nitecralwer WR35. One difficulty is that I wanted to employ the Takahashi 645 0.72X Reducer, which would take the focal length down from 530mm to 382mm. That would give me a nice wide field similar to what I get with the Redcat 71 and it would turn it into a very fast scope at F3.6. This reducer has to be installed inside the scope and could potentially get in the way of a third-party focuser. But Moonlite has this all figured out and makes a special adapter for the FSQ with reducer.
I would really have liked to put a Moravian C5a-100M camera with its giant medium-format sensor on this scope. But the FSQ's image circle (the area on a camera sensor the scope is capable of illuminating within focus tolerances) is to small to support medium format. But it is large enough to support full frame. So I went with a Moravian C3-61000 Pro with industrial sensor and extended cooling. I plan to do far more than 300 hours per year of imaging on this camera, which is the recommended limit for commercial sensors, so that dictated the choice of the industrial sensor. Further, having an extended cooling range of up to 45C below ambient means that given the weather range on the mesa in Santa Fe, I can shoot at -10C year round and not have to manage calibration and light frames for multiple sensor temperatures. One advantage of the C3 and C5 is that they come with physical shutters. With my ZWO cameras, I have to physically cover the end of the telescope to take dark and flat-dark calibration frames. Having the physical shutter on the camera eliminates that need. And it has the further benefit of protecting the camera sensor window against stray dust particles when no in use. The next issue was the off-axis guider (OAG). I really like Optec's Sagitta OAG and have one on the TOA and another on the CDK12. And while there's no strict backfocus requirement for a Petzval, there is only so much space to put things between the telescope and the camera and still be able to achieve and adjust focus. The Sagitta is just bit too big for that.
This means I was forced to go with the C3's native OAG. It has no focuser, and the clamp bolts are plastic and pretty flimsy, so I didn't like going this route. The OAG camera sensor has to be exactly 22mm from the interior surface of the camera mount to be parfocal with the main camera sensor. I had to have a ring adapter cut to precisely 12mm at a local machine shop to make that happen. The good news is that at a focal length of 382mm, anything reasonably close to focus is going to work for the guide cam.
Next up was selecting a suitable flat-field panel and cover for the scope. I had been very happy with the Alto-Giotto combo from PrimaLuce Labs on the TOA, so I went with that here, too. That piece of gear has performed exceptionally well. I've had a few connection issues with it over the last year and a half, but those can be attributed to a faulty USB cable. I stupidly cut a corner here and didn't have custom cables made by USBFireWire like I did for the TOA. Nevertheless, I put that issue to bed by simply replacing the USB cable. The Giotto has been fabulous, delivering flat fields that calibrate my images perfectly. I've really struggled with poor flat-field generators in the past, so I really appreciate this.
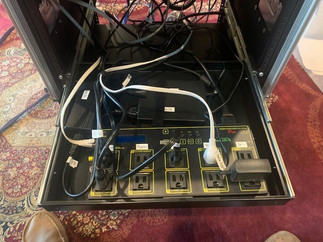
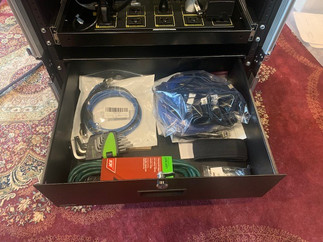
One thing, however, that is a constant pain in this astrophotography endeavor is matching up power cables. Most pieces of 12V gear use 5.5mm X 2.1mm plugs. Not the Alto-Giotto. It uses 5.5mm X 2.5mm plugs. A cable with a 2.1mm male end and a 2.5mm male plug at the other end is impossible to find. So I had to buy small adapters on Amazon for this. I truly wish the industry would standardize on one or the other. I don't care which. As for the external USB/12V power hub, I went with the Pegasus Pocket Powerbox Advance Gen 2. Pegasus has put out some dicey software updates lately. And I've seen a few of these die in the field. But overall, they've been reliable for me. The remainder of the gear for the rig included the enclosure, electronics, spare cables, spare parts, and specialized tools. I went with the same standard gig-rig enclosure I have on the TOA. As with the TOA's enclosure, I drilled two 2" holes—one at the top, and one at the bottom—for cable entry and exit. Then I installed a one fixed and a couple of extendable shelves and an enclosed drawer for the interior. Inside the enclosure, I mounted the control computer—yet another Intel NUC—and a small TPLink switch for connecting to the mount, the control computer, the infrastructure, and the remote power strip.
Why Intel NUCs, you ask? I'm glad you asked. Some people swear by cheap MeLE mini PCs in the $200 range. I've used several of them in the past. I found them to be underpowered and unreliable. It may have once been that a slow processor was enough to control a telescope. But the multi-processing demands of NINA add-ins like Hocus Focus and other activities in a remote environment like safety monitoring, remote data transfer, and remote desktop access make it necessary to have a capable processor with plenty of memory and fast drive space. Further, a remote environment may have data transfer limitations that require data pre-processing (i.e., stacking) before it can be transferred. That requires a capable computer.
Others have suggested using fanless industrial PCs. I'm sure these would work fine, be very reliable, and be up to the processing demands a remote rig may require. But they're also very pricey. To get one configured with an i( processor, 64GB RAM, and a 2TB or 4TB NVMe SSD starts to exceed $3,000. An Intel NUC similarly configured costs a third of that. So I can have two NUCs fail (I've never had one fail at all) before I get to that price. I freely admit that I can only get away with this because temperatures in Santa Fe generally stay within the Intel NUC's stated operating temperatures of 32F and 110F. It does get colder than 32F there quite often, but by keeping all the electronics in an enclosure, the heat they generate has always kept the interior above freezing. If, however, you are operating in a more extreme environment, you may need to shell out for an industrial PC with higher tolerances.
Many people also recommend the PrimaLuce Labs Eagle. I find these to be underpowered and overpriced. Yes, they have all the USB and power distribution connectivity of a Pegasus box along with a PC that may be adequate to control the scope. But at $3,000 to get a computer that doesn't really approach the specs of an Intel NUC, it's not worth it. I can get two NUCs and two Pegasus boxes for less than the price of one Eagle. I've seen many problems with Eagles out in the field, and because they typically live between the mount dovetail and the scope, it requires taking apart the entire telescope to have them repaired.
I've been very happy with the NUC/Pegasus combo and have never looked back. I also placed the 10Micron control box and hand controller inside the enclosure to protect them from heat, cold, and dust. This meant that I had to buy the one-meter data/power extension cable specifically made for 10Micron mounts—a pretty pricey little piece of rubber and plastic. The various power bricks for the 10Micron controller, the Pegasus hub, the NUC, and the Switch are also inside the enclosure as are spare cables and Allen wrenches specially designed for the scope and its accessories. I also got a spare desiccant cylinder for the camera that is stored here.
One more thing I mounted inside the enclosure is a Digital Loggers Web Pro remote power strip that lets me power cycle everything from home. On top of the enclosure, I attached an MGPBox, which provides GPS and environmental data to the mount, and a Nest camera to monitor the rig.
Early on, I used a Jackery 1000 portable battery as a backup power supply. I had used these for several years at home to great effect. But in the newer models (post 2022), Jackery changed the design. With the older models, power was always supplied from the battery and the battery recharged from shore power if it was plugged in. In the newer designs, power is supplied by the shore when it's plugged in and it only switches to battery power when shore power is cut. This makes sense from a battery life perspective. But the problem is that, unbeknownst to me when I bought these newer Jackerys, it takes 300ms for the battery to kick in. That's too long. It rendered the Jackery useless as an uninterruptible power supply. So I switched to an actual UPS, a Cyberpower CP1500. It has worked flawlessly. And if you purchase the cloud membership, you can download an app that will message your phone when a power event occurs. It also protects both your power and network lines against power surges. And it plugs into your control PC and has a neat little app that shows you stats in real time and tracks events.


For processing images, I use AstroPixelProcessor (APP) to stack the images. I hate the interface. You can't even save your work from session to session. And if you ever long for 1994, just spend a few hours with APP. The vast majority of people in this avocation use PixInsight's Weighted Batch Preprocessing Script. It has a good interface, you can save your work, and you at least feel like you've made it slightly beyond Y2K. But I find that it just doesn't produce results that are as good as APP for me. The middle section of work belongs exclusively to PixInsight. If you ever want to travel deep down inside the object -oriented orifice of a purist programmer's punctilious wet dream of UI design, then PixInsight is for you. If you prefer intuitive experiences, stay away. Stay very far away. It's a bear to learn. More difficult than any 1970s command-line-driven mainframe batch process I ever used. But it gets better with time and experience. And the things it actually does are off-the-charts insanely good. For those keeping score at home, I use PixInsight from just after stacking until LRGB recombination (of a starless image).
The rest belongs to Photoshop. Its interactivity makes it my tool of choice for masking, color adjustment, contrast, saturation, recombination (e.g., stars, Ha, etc.), resampling, and saving final images.
I apologize for duplicating much of this story in the TOA and CDK galleries, but many of the details are the same. My hope is that it might help someone who is considering installing a telescope remotely or already has a remote rig. Perhaps there are one or two ideas that might be of use. In any case, please take a look at the images below that I have taken with this setup. I couldn't be happier with it and the results it produces.